
basic knowledge
return shit like è¾è®¯å°åè·åä½ç½®
response = requests.post()
r = response.content.decode('utf-8')
print(r)
will be fine
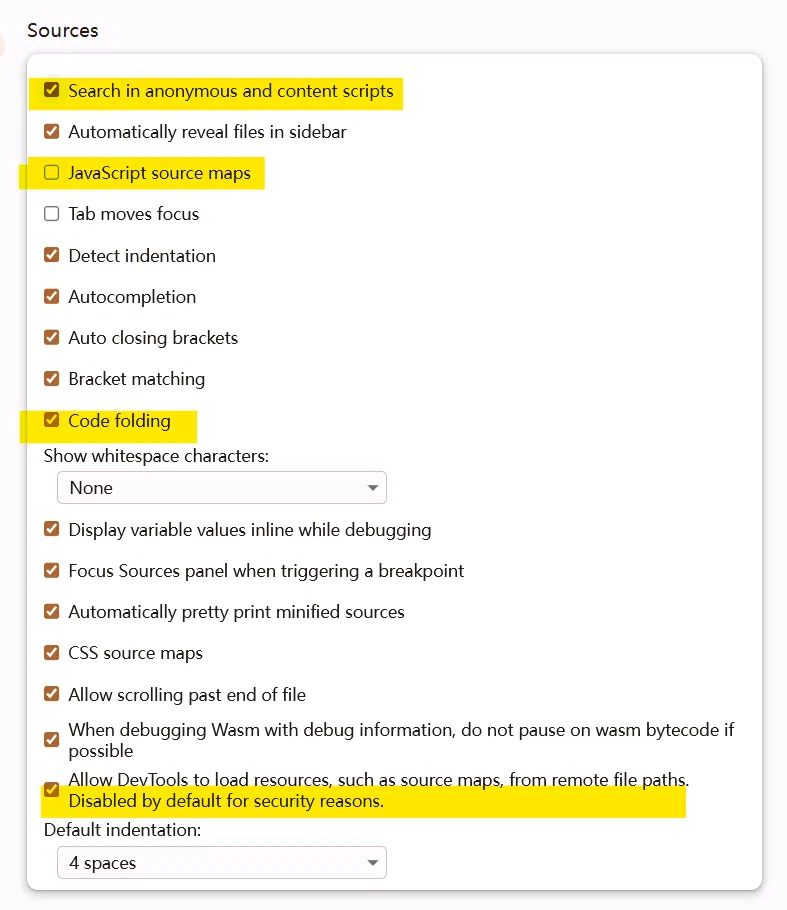
devtools preference setting
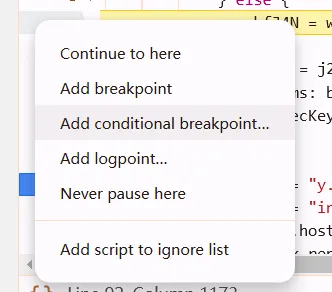
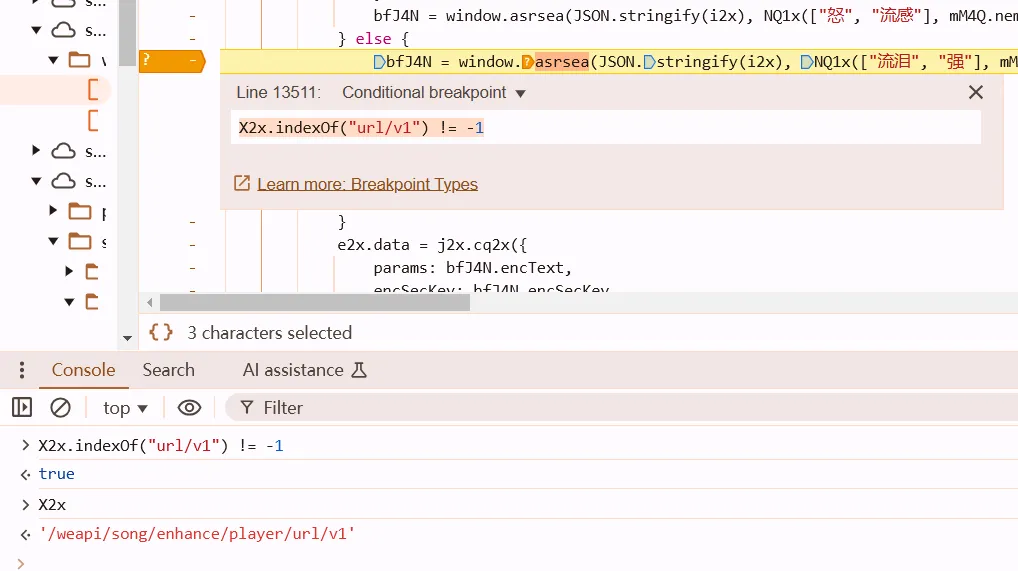
breakpoint tips
sometimes we only except the certain url at the breakpoint
right click
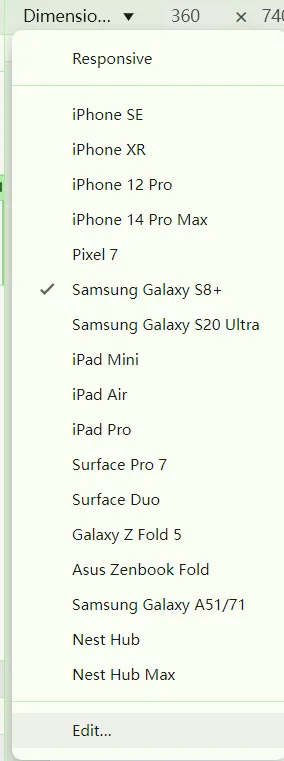
change UA on devtools
convert curl 2 python
in pycharm’s market, search Headers. this plugin let you copy headers in develop tools and paste it in pycharm conveniently. just right click and choose Headers -> Headers
magic numbers for encrypting
- sha1
[1732584193, 4023233417, 2562383102, 271733878, 3285377520]
- md5
[1732584193, 4023233417, 2562383102, 271733878]
proxy
use clash for example
import requests

url = "https://www.google.com.sg/"
headers = {
    'user-agent': 'Mozilla/5.0 (Windows NT 10.0; Win64; x64) AppleWebKit/537.36 (KHTML, like Gecko) Chrome/109.0.0.0 Safari/537.36'
}
proxy = {
    "http": "http://127.0.0.1:7890",
    "https":"http://127.0.0.1:7890"
}

resp = requests.get(url, headers=headers, proxies=proxy)
print(resp.text)
URLEncode
Chinese -> shit like%..
https://www.sogou.com/web?query=%E5%90%83%E9%A5%AD%E7%9D%A1%E8%A7%89%E6%89%93%E8%B1%86%E8%B1%86&_asf=www.sogou.com&_ast=&w=01019900&p=40040100&ie=utf8&from=index-nologin&s_from=index&sut=3119&sst0=1630994614300&lkt=0%2C0%2C0&sugsuv=1606978591882752&sugtime=1630994614300
from urllib.parse import urlencode, unquote, quote

# 单独编码字符串
wq = "会写点代码的本子画手"
print(quote(wq))  # '%E4%BC%9A%E5%86%99%E7%82%B9%E4%BB%A3%E7%A0%81%E7%9A%84%E6%9C%AC%E5%AD%90%E7%94%BB%E6%89%8B'
print(quote(wq, encoding="gbk")) # '%BB%E1%D0%B4%B5%E3%B4%FA%C2%EB%B5%C4%B1%BE%D7%D3%BB%AD%CA%D6'

# 多个数据统一进行编码
dic = {
    "wq": "本子画手是什么",
    "new_wq": "在本子上画画的人"
}

print(urlencode(dic))  # %E6%9C%AC%E5%AD%90%E7%94%BB%E6%89%8B%E6%98%AF%E4%BB%80%E4%B9%88&new_wq=%E5%9C%A8%E6%9C%AC%E5%AD%90%E4%B8%8A%E7%94%BB%E7%94%BB%E7%9A%84%E4%BA%BA
print(urlencode(dic, encoding="utf-8"))  # 也可以指定字符集

# 一个完整的url编码过程
base_url = "http://www.baidu.com/s?"
params = {
    "wd": "会写点代码的本子画手"
}

url = base_url + urlencode(params)
print(url)  # http://www.baidu.com/s?wd=%E4%BC%9A%E5%86%99%E7%82%B9%E4%BB%A3%E7%A0%81%E7%9A%84%E6%9C%AC%E5%AD%90%E7%94%BB%E6%89%8B

# url decode
s = "http://www.baidu.com/s?wd=%E5%A4%A7%E7%8E%8B"
print(unquote(s))  # http://www.baidu.com/s?wd=大王
session
import requests
session = requests.session()
# 全局的请求头 每次请求都有
session.headers = {
    "User-Agent": "Mozilla/5.0 (Windows NT 10.0; Win64; x64) AppleWebKit/537.36 (KHTML, like Gecko) Chrome/107.0.0.0 Safari/537.36"
}

# 1. 加载第一个请求
session.get("https://user.wangxiao.cn/login?url=http%3A%2F%2Fks.wangxiao.cn%2F")
# print(session.cookies)
# 2. 加载验证码图片
img_resp = session.post("https://user.wangxiao.cn/apis//common/getImageCaptcha",
                        headers={
                            "Content-Type": "application/json;charset=UTF-8"
                        })  # 两个请求头会合并在一起  一次性请求头 只有这个请求会有它
print(img_resp.request.headers)  # 看看请求头
extract data
re
xpath
thread & process
asyncio
import asyncio
import aiohttp  # used to send requests asynchronously
import aiofiles  # write files asynchronously

my_headers = {}

async def download_one_img(url):
    file_name = url.split("/")[-1]
	async with aiohttp.ClientSession(headers=my_headers) as session:
        async with session.get(url) as resp:
            # result = await resp.text()
    		content = await resp.content.read()  # wait for bytes, like pictures
            async with aiofiles.open(file_name, mode='wb') as f:
                await f.write(content)


async def download(url):
    print("start")
    await asyncio.sleep(0.5)  # downloading a img...
    print("finished")
    return "this is a string"

async def main():
    urls = [
        'http://xx1',
        'http://xx2',
        'http://xx3',
    ]
    tasks = []
    for url in urls:
        tasks.append(asyncio.create_task(download(url)))
    done, pedding = await asyncio.wait(tasks)
    for d in done:
        print(d.result())


if __name__ == '__main__':
    asyncio.run(main())
RuntimeError: Event loop is closed may occurs on Windows platform
just change asyncio.run(main()) into
    loop = asyncio.get_event_loop()
    loop.run_until_complete(main())
data base
mysql
net start mysql57
mysql -u root -p
6666
SHOW DATABASES;
Redis
one of nosql database. faster than MySQL, large space, “high performance”
as a cache/memory/middleware”
** for high concurrency, distributed web crawlers **
preparatory work
- close bind
# bind 127.0.0.1 ::1 # comment it
- close protect mode (windows dont do this)
protected-mode no # set as no
- open redis.windows.conf
requirepass 123456 # set password
# install redis on windows platform. enter the file position first
redis-server.exe --service-install redis.windows.conf --loglevel verbose
# uninstall redis server
redis-server --service-uninstall
# start
net start redis
or
redis-server --service-start
# stop
redis-server --service-stop
Set it in the environment variables
connect to redis
redis-cli
auth [password]   # if it has password, if not, ignore it
Redis common data types
- String
set [key] [value]  # add a new data
get [key]		   # Retrieve the data
incr [key]       # Increment the data corresponding to this [key] by 1 (atomic, safe)
incrby [key] [count]     # Increment the value corresponding to the [key] by [count]
type [key]		# View the data types (all items inserted into a set are always strings)
- List
LPUSH [key] data1 data2 data3 ... # Insert data1, data2, data3, etc., from the left into the list named key, resulting in the order [data3, data2, data1]
RPUSH [key] data1 data2 data3.... # Insert data1, data2, data3, etc., from the right into the list named key, resulting in the order [data1, data2, data3, ...]
LRANGE [key] start stop     #  Retrieve elements from the list named [key] between the start and stop indices.  `LANGE [key] 0 -1` retrieve all elements

LLEN key	# Return the length of the list named key
LPOP [key]        # Remove and return the first element (from the left) of the list named key
RPOP key		# Remove and return the last element (from the right) of the list named key
- Set
SADD [key] value   # Add the specified member to the set stored at key
SMEMBERS [key]  # Return all the members of the set value stored at key
SCARD [key] # Get the number of members in a set
SISMEMBER [key] val  # Check if the specified value is in the set stored at key
SUNION key1 key2  # Compute the union of the sets given by the specified keys
SDIFF key1 key2  # Compute the difference between the sets stored at key1 and key2
SINTER key1 key2 #  Compute the intersection between the sets stored at key1 and key2
SPOP [key]  # Remove and return a random member from the set
SRANDMEMBER [key] count # Get one or multiple random members from the set
- Sorted Set
ZADD key s1 m1 s2 m2 ... # Add the specified members with the specified scores to the sorted set stored at key
ZRANGE key start stop [withscores]   # Retrieve all the elements in the sorted set stored at key within the range from start to stop, with the optional inclusion of their scores
ZREVRANGE key start stop # Retrieve all the elements in the sorted set stored at key within the range from start to stop, in reverse order
ZCARD key   # Get the number of members in a sorted set
ZCOUNT key min max  # Count the number of members in a sorted set with scores within the given range
ZINCRBY key score member  # Increment the score of a member in a sorted set by the given amount
ZSCORE key m  # Get the score of a member in a sorted set
ZREM key m # delet the sepecific m
ZRANK key m # judge if m exists in key, return 1 if exist, is not, reutrn null
- Hash similar to dictinory
hset [key] k1 v1   # Store the key-value pair k1, v1 in the hash named key
hget [key] k1      # Retrieve the value associated with k1 from the hash named key
hmset [key] k1 v1 k2 v2 k3 v3....  # Store multiple key-value pairs in the hash named key
hmget [key] k1 k2....# Retrieve multiple values from the hash named [key] for the specified keys
hgetall [key] 	# Retrieve all items in the hash named key
hkeys key		# Retrieve all keys from the hash named key
hvals [key] 		# Retrieve all values from the hash named key
- Bitmap
- HyperLogLog
- Geospatial
mongoDB
git
查看某个提交之前的文件内容(不改变当前工作目录)
git checkout <commit_hash> -- <file_path>
When you’ve cloned a repository from GitHub, made changes to the code, and want to push those changes to your own repository while also pulling in the latest updates from the original repository, you can follow these steps:
Add Your Remote Repository: First, you need to add the remote repository where you want to push your changes. This is typically your GitHub repository.
git remote add origin <your-repository-url>Check the Status of Your Branch: Check the status of your branch to ensure your changes have been committed.
git statusCommit Your Changes: If your changes are not yet committed, use
git addto stage the changes and thengit committo commit them.git add . git commit -m "Describe your changes"Pull the Latest Updates from the Original Repository: Before pushing your changes, you need to pull the latest updates from the original repository. First, you need to add the original repository as another remote source.
git remote add upstream <original-repository-url>Fetch the Latest Updates from the Original Repository: Fetch the latest updates from the
upstreamremote source.git fetch upstreamMerge the Updates: Merge the updates from the original repository into your current branch.
git merge upstream/mainHere, it’s assumed that the branch you cloned is
main. If it’s a different branch, replacemainwith the appropriate branch name.Resolve Conflicts: If there are conflicts during the merge, you’ll need to manually resolve them. After resolving conflicts, use
git addto stage the changes andgit committo commit the code with conflict resolutions.Push to Your Repository: Once the merge is complete and there are no conflicts, you can push your changes to your remote repository.
git push origin mainRegularly Sync: To keep your branch in sync with the original repository, you can regularly repeat steps 4 to 8.
Please note that if your changes conflict with the changes in the original repository, you may need to manually resolve these conflicts. Always ensure you have a backup of your work in case you need to revert to a previous state.
In summary, cloning is about creating a local copy of a repository that you can work on independently, while forking is about creating a personal copy of a repository on a platform like GitHub to contribute to or modify without affecting the original project. Forking is often the preferred method when you want to contribute changes back to the original repository, as it simplifies the process of submitting pull requests.
certificate installation
checkout certificate
redmi:设置 - 密码与安全 - 系统安全 - 加密与凭据 - 【信任的凭据 + 用户凭据】
sometimes you have installed trustmealready or justtrustme but app still popping out message like without internet
that may because your certificate is outdated, reinstalled certificate can fix it.
mitm
https://www.cnblogs.com/oboth-zl/p/13818981.html
go checkout
C:\Users\Administrator\.mitmproxy>>>openssl x509 -subject_hash_old -in 证书文件路径will output number like
c8750f0d.0rename
mitmproxy-ca-cert.pemto that number
adb shell
su
#挂载系统目录为可写
mount -o rw,remount /
mv /sdcard/c8750f0d.0 /system/etc/security/cacerts
#修改证书权限
chmod 644 /system/etc/security/cacerts/c8750f0d.0
proxy
- clash
proxy = {
    "http": "http://127.0.0.1:7890",
    "https": "http://127.0.0.1:7890"
}
- charles
proxy = {
    "http": "http://127.0.0.1:8888",
    "https": "http://127.0.0.1:8888"
}
mitm
brupsuit